What Is CyberPanel?
CyberPanel is a web hosting control panel powered by OpenLiteSpeed/LiteSpeed Enterprise, designed to make hosting websites, email, databases, and DNS easy. It includes SSL management, backup tools, file management, and more through a web UI.
💡 System Requirements
Before you begin, make sure your system meets these:
Ubuntu 20.04 / 22.04 LTS (fresh server recommended)
1+ CPU, 1GB+ RAM (2GB recommended for production)
10GB+ disk space
Root access (or sudo privileges)
Static IP recommended
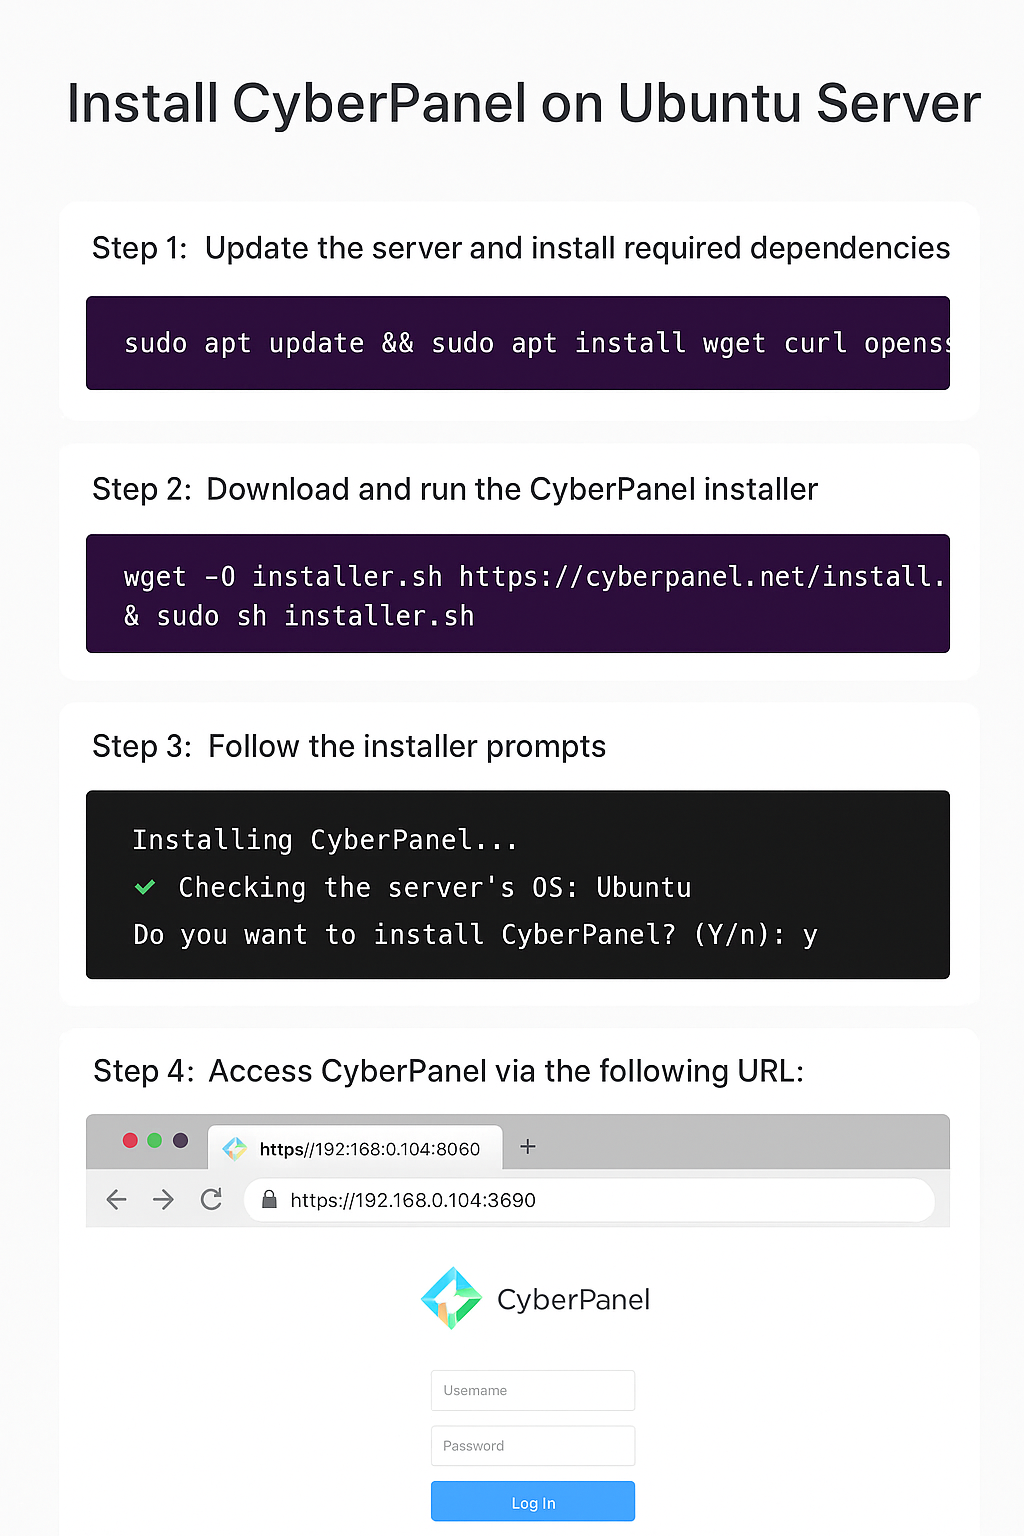
🚀 Step 1 — Update Server Packages
Start by updating package lists and upgrading installed packages:
sudo apt update && sudo apt upgrade -y
If you see errors, it may be due to locked apt processes. Fix with:
sudo killall apt apt-get
sudo rm /var/lib/apt/lists/lock
sudo rm /var/cache/apt/archives/lock
sudo rm /var/lib/dpkg/lock*
sudo dpkg --configure -a
🚪 Step 2 — Disable Unnecessary Services (Optional but Recommended)
Check for and stop services like Apache (conflicts with CyberPanel’s web servers):
sudo systemctl stop apache2
sudo systemctl disable apache2
If Nginx is running:
sudo systemctl stop nginx
sudo systemctl disable nginx
🛠 Step 3 — Install Required Packages
CyberPanel needs a few base tools:
sudo apt install wget curl sudo -y
If wget or curl fails, check your DNS or network:
ping 8.8.8.8
If that works but domain names don’t resolve:
sudo nano /etc/resolv.conf
Add:
nameserver 8.8.8.8
nameserver 1.1.1.1
Save and retry.
📥 Step 4 — Download and Run the CyberPanel Installer
Download the official installer script and run it:
wget -O installer.sh https://cyberpanel.net/install.sh
sudo chmod +x installer.sh
sudo bash installer.sh
The installer will ask options:
Install CyberPanel → Choose 1.
Install with OpenLiteSpeed or LiteSpeed Enterprise → OpenLiteSpeed is free.
Set Admin Password → Keep a secure one.
Sample choices:
1 - Install
1 - OpenLiteSpeed
Y - Setup Remote MySQL (if needed)
⏳ Step 5 — Wait for Installation to Complete
The installer will:
Install web server (OpenLiteSpeed)
Set up MariaDB (MySQL variant)
Install PHP versions
Configure email, FTP, DNS, and more
It may take 10–30 minutes depending on your server.
If it fails midway — first check logs:
tail -n 100 /root/installerErrors.log
Common cause: firewall preventing downloads — try disabling firewall temporarily:
sudo ufw disable
Then re-run installer.
🔐 Step 6 — Set Up Firewall
Once installed, re-enable firewall:
sudo ufw enable
sudo ufw allow 80/tcp
sudo ufw allow 443/tcp
sudo ufw allow 8090/tcp
Ports explained:
80/443 = Web traffic
8090 = CyberPanel dashboard
Check status:
sudo ufw status verbose
🌐 Step 7 — Access CyberPanel Dashboard
Open your browser and visit:
https://your-server-ip:8090
Login with:
Username: admin
Password: (what you chose during install)
If the page won’t load, check:
sudo netstat -tulpn | grep 8090
If not listening, restart CyberPanel:
sudo systemctl restart lscpd
🧪 Step 8 — Create a Website
In the dashboard:
Go to Websites → Create Website
Choose domain, PHP version, DNS records, email
🔐 Optional — Enable SSL (Let’s Encrypt)
Once a website is set up:
Go to Websites → List Websites
Click Manage
Click Issue SSL
If SSL fails due to DNS issues:
dig +short yourdomain.com
Ensure it returns your server IP.
🐘 Optional — Install phpMyAdmin
If you need database GUI:
sudo apt install phpmyadmin -y
Then link it under /usr/local/lsws/Example/html/phpmyadmin.
⚠️ Common Troubleshooting
❌ “Command not found” Errors
Fix by ensuring PATH is correct or installing missing tools:
sudo apt install coreutils
❌ MySQL Connection Errors
Check service:
sudo systemctl status mariadb
If inactive:
sudo systemctl restart mariadb
sudo mysql_secure_installation
❌ Port Conflicts (80/443)
If ports are in use:
sudo lsof -i :80
sudo lsof -i :443
Kill conflicting process:
sudo kill <PID>
❌ Let’s Encrypt Rate Limit
If too many requests recently:
acme.sh --cron --home /root/.acme.sh
Wait 1 hour and retry.
🧾 Helpful Commands Summary
Task Command
Restart CyberPanel sudo systemctl restart lscpd
Check CyberPanel Status sudo systemctl status lscpd
Restart OpenLiteSpeed sudo systemctl restart lsws
Check open ports sudo ss -tulpn
Firewall status sudo ufw status verbose
View installer logs tail -n 100 /root/installerErrors.log
🎯 Final Advice
Always backup before major changes.
Use a non-root sudo user for security.
Keep Ubuntu updated:
sudo apt update && sudo apt upgrade -y
🔐 CYBERPANEL OPTIMIZATION GUIDE
1️⃣ Security Hardening (VERY IMPORTANT)
🔒 1.1 Change Default Admin Port (Optional but Recommended)
CyberPanel runs on port 8090, which is commonly scanned.
Change port:
sudo nano /usr/local/lscp/conf/lscp.conf
Find:
adminPort 8090
Change to:
adminPort 9090
Restart CyberPanel:
sudo systemctl restart lscpd
Open firewall:
sudo ufw allow 9090/tcp
🔑 1.2 Enable Two-Factor Authentication (2FA)
CyberPanel Dashboard →
Users → Modify User → Enable 2FA
This protects against brute-force attacks.
🔥 1.3 Secure Firewall Rules (UFW)
Recommended firewall setup:
sudo ufw default deny incoming
sudo ufw default allow outgoing
sudo ufw allow 22/tcp
sudo ufw allow 80/tcp
sudo ufw allow 443/tcp
sudo ufw allow 8090/tcp
sudo ufw enable
Check status:
sudo ufw status verbose
🛑 1.4 Disable Root SSH Login
Edit SSH config:
sudo nano /etc/ssh/sshd_config
Change:
PermitRootLogin no
PasswordAuthentication no
Restart SSH:
sudo systemctl restart ssh
⚠️ Make sure you have SSH key login before disabling passwords.
🧠 1.5 Install Fail2Ban
Protects against brute-force attacks.
sudo apt install fail2ban -y
sudo systemctl enable fail2ban
sudo systemctl start fail2ban
Check status:
sudo fail2ban-client status
2️⃣ PERFORMANCE & CACHING OPTIMIZATION
CyberPanel uses OpenLiteSpeed, which is extremely fast when caching is configured correctly.
🚀 2.1 Enable LSCache (WordPress)
In CyberPanel:
Websites → List Websites → Manage
Enable LiteSpeed Cache
Install WordPress plugin:
LiteSpeed Cache
Recommended LSCache Settings:
Cache Logged-in Users: ❌ OFF
Cache Mobile: ✅ ON
Browser Cache: ✅ ON
Object Cache: Redis (if available)
⚡ 2.2 Enable GZIP & Brotli Compression
CyberPanel →
Server → Tuning → GZIP Compression
Enable:
GZIP
Brotli
Restart server:
sudo systemctl restart lsws
🧠 2.3 PHP Optimization
Go to:
Server → PHP → Edit PHP Config
Recommended changes:
memory_limit = 512M
max_execution_time = 300
upload_max_filesize = 128M
post_max_size = 128M
opcache.enable = 1
opcache.memory_consumption = 256
Restart PHP:
sudo systemctl restart lsws
🗃️ 2.4 Enable Redis (Optional but Powerful)
Install Redis:
sudo apt install redis-server -y
sudo systemctl enable redis
sudo systemctl start redis
Check:
redis-cli ping
Output should be:
PONG
Enable Redis in LSCache plugin.
3️⃣ EMAIL DELIVERABILITY OPTIMIZATION
This is critical to prevent emails going to spam.
📧 3.1 Set Correct Hostname
hostnamectl set-hostname mail.yourdomain.com
Edit hosts:
sudo nano /etc/hosts
Add:
SERVER_IP mail.yourdomain.com
Restart:
sudo reboot
✉️ 3.2 Enable SMTP Service
CyberPanel →
Email → Email Configuration → Enable SMTP
Test sending email.
🛡️ 3.3 SPF, DKIM, DMARC (VERY IMPORTANT)
SPF Record
v=spf1 ip4:SERVER_IP include:_spf.google.com ~all
DKIM
CyberPanel →
Email → DKIM Manager → Generate DKIM
Add generated TXT record to DNS.
DMARC
v=DMARC1; p=none; rua=mailto:postmaster@yourdomain.com
🧪 3.4 Test Email Reputation
Check:
https://mail-tester.com
https://mxtoolbox.com
4️⃣ DNS SETUP TUTORIAL (STEP-BY-STEP)
🌐 4.1 Basic DNS Records
Type Name Value
A @ SERVER_IP
A www SERVER_IP
A mail SERVER_IP
📬 4.2 MX Record (Email)
Type: MX
Name: @
Priority: 10
Value: mail.yourdomain.com
🔐 4.3 SPF Record
Type: TXT
Name: @
Value: v=spf1 ip4:SERVER_IP ~all
🧾 4.4 DKIM Record
Type: TXT
Name: default._domainkey
Value: (Paste DKIM value from CyberPanel)
🛡️ 4.5 DMARC Record
Type: TXT
Name: _dmarc
Value: v=DMARC1; p=none; rua=mailto:postmaster@yourdomain.com
🔍 4.6 Verify DNS
Check A record:
dig yourdomain.com
Check MX:
dig MX yourdomain.com
Check SPF:
dig TXT yourdomain.com
🧰 TROUBLESHOOTING COMMANDS
❌ Website Not Loading
sudo systemctl restart lsws
sudo systemctl status lsws
❌ CyberPanel Not Opening
sudo systemctl restart lscpd
sudo netstat -tulpn | grep 8090
❌ Email Not Sending
sudo systemctl restart postfix
sudo tail -f /var/log/mail.log
❌ SSL Not Issuing
dig yourdomain.com
Ensure IP matches server.
✅ FINAL RECOMMENDATIONS
✔ Use Cloudflare (DNS + Security)
✔ Keep Ubuntu updated
✔ Use SSH keys only
✔ Regular backups
✔ Monitor logs weekly
🌐 Cloudflare + CyberPanel Setup (Best Practice)
1️⃣ Add Your Domain to Cloudflare
Go to Cloudflare → Add Site
Select Free Plan
Cloudflare will scan existing DNS records
Required DNS Records in Cloudflare
Type Name Value Proxy
A @ SERVER_IP 🟠 Proxied
A www SERVER_IP 🟠 Proxied
A mail SERVER_IP ⚪ DNS only
MX @ mail.yourdomain.com ⚪ DNS only
⚠️ Mail records must NOT be proxied
2️⃣ Change Nameservers
At your domain registrar, replace nameservers with Cloudflare’s.
Propagation may take 5–24 hours.
Verify:
dig NS yourdomain.com
3️⃣ Cloudflare SSL Settings (VERY IMPORTANT)
Cloudflare → SSL/TLS
Encryption Mode: Full (Strict)
Enable Always Use HTTPS
Enable Auto Minify (HTML, CSS, JS)
Enable Brotli
4️⃣ CyberPanel SSL Configuration
In CyberPanel:
Websites → List Websites → Manage
Issue Let’s Encrypt SSL
If SSL fails:
dig yourdomain.com
Ensure IP matches server.
5️⃣ Firewall & Security Rules
Cloudflare → Security → WAF
Enable:
Managed Rules
Bot Fight Mode
Rate Limiting
Lock CyberPanel Admin Access
Only allow your IP:
sudo ufw allow from YOUR_IP to any port 8090
sudo ufw deny 8090
🚀 WordPress Speed Optimization Checklist
1️⃣ Server-Level Optimizations
✔ OpenLiteSpeed
✔ LSCache Enabled
✔ PHP 8.1 or 8.2
✔ Redis Object Cache
Check PHP:
php -v
2️⃣ WordPress Plugins (Minimal & Powerful)
Install ONLY these:
LiteSpeed Cache
Redis Object Cache
WP-Optimize (Database)
❌ Avoid multiple cache plugins
3️⃣ LiteSpeed Cache Settings (Recommended)
Cache
Enable Cache: ✅
Cache Mobile: ✅
Browser Cache: ✅
Page Optimization
CSS Minify: ✅
JS Minify: ✅
Load JS Deferred: ✅
Critical CSS: ✅
Media
Lazy Load Images: ✅
WebP Images: ✅
4️⃣ Database Optimization
Optimize weekly:
wp db optimize
Or via plugin.
5️⃣ Image Optimization
Use:
LiteSpeed Image Optimization
ShortPixel (optional)
6️⃣ Cron Optimization (Important)
Disable WP cron:
define('DISABLE_WP_CRON', true);
Add real cron:
crontab -e
/5 * wget -q -O - https://yourdomain.com/wp-cron.php?doing_wp_cron >/dev/null 2>&1
7️⃣ Speed Testing Tools
https://pagespeed.web.dev
https://gtmetrix.com
https://webpagetest.org
💾 CyberPanel Backup & Disaster Recovery Guide
1️⃣ Enable Automatic Backups
CyberPanel → Backup → Schedule Backup
Recommended:
Frequency: Daily
Retention: 7 days
Backup Location: Remote (SFTP, Google Drive)
2️⃣ Manual Backup (CLI)
Backup website:
cyberpanel createBackup --domain yourdomain.com
Backup database:
mysqldump -u root -p dbname > backup.sql
3️⃣ Remote Backup (Highly Recommended)
Install rclone:
curl https://rclone.org/install.sh | sudo bash
Configure:
rclone config
Sync backups:
rclone sync /home/backup gdrive:cyberpanel-backups
4️⃣ Restore Website Backup
CyberPanel →
Backup → Restore Backup
Or CLI:
cyberpanel restoreBackup --domain yourdomain.com --file backup.tar.gz
5️⃣ Disaster Recovery (SERVER FAILURE)
Step 1 — New Server
Install Ubuntu
Install CyberPanel
Step 2 — Restore Backup
rclone sync gdrive:cyberpanel-backups /home/backup
cyberpanel restoreBackup --file fullbackup.tar.gz
6️⃣ Backup Verification
Always test restore:
ls -lh /home/backup
Check logs:
tail -f /usr/local/CyberCP/debug.log
7️⃣ Security for Backups
✔ Encrypt backups
✔ Restrict permissions
✔ Offsite storage
✔ Weekly restore test
🧠 FINAL PRO TIPS
✔ Cloudflare + LSCache = insane speed
✔ Use Full (Strict) SSL only
✔ Never proxy mail through Cloudflare
✔ Backups save lives
✔ Monitor logs weekly